System Name: Asset & Work Manager (AWM) - formerly called RAMM
Software Company: ThinkProject
New User
If you are a new user, you will need to be issued with a login. Request a login by contacting support@pngroads.com.
You will need to include the username, email address, mobile phone number, role and province.
KnowledgeBase
The DoWH have set up a knowledgebase to support asset management, road management and the use of AWM by DoWH staff and external parties.
The knowledge base is called: WorksKuru
Website: help.pngroads.com
AWM Access & Login
Website Address: https://go.ramm.com
Login process:
- Enter the web address into your web browser or use your saved bookmark
- Enter username (this will be your email address in the future)
- Click on ‘Next’

- Enter your password and click on ‘Log In’
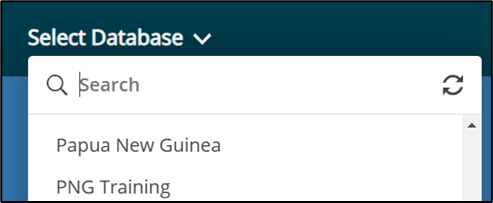
- Select the database you want to use (switch between the Master database and the Training database)


AWM Map Screen

List of Current Information Available as at Rollout

Other Base Layers
Select the Hamburger icon to access other Base Layers or to use a Custom Base Layer.

Viewing information in Map and Grid
Select Menu in the top left corner.


To find assets and other information you can click on the ‘Asset and Inventory’ icon in the list or search directly for what you require.
Search for the asset data as per the available information shown in the list above.
Note you can ‘star’ items to set them as a favourite.
Viewing small items on the map
When using the Standard view where all assets are drawn on the map in their proper location rather than Clustered, smaller assets can often be difficult to spot/locate as you zoom out:

In the “Configure” menu, you can find an option “Show Small Items as Points” – ticking this will cause the asset to display as a point at more distant zooms, making it easier to spot them – note the difference in the same bridge compared to the screenshot above:

Customising and saving views
Select ‘Configure’ .

To Save any setting you make for future use:
Press 'Settings'. | Then ‘Save As’ to save your settings (map layer). |
Provide a new name and then press ‘Save’.

Filtering data
Select the filter icon to do a quick filter from the Map Layer Label.

Map layer packages
The Map Layer Packages can be accessed through the small cog icon in the menu at the top left of the map screen.
Click ‘Settings Cog’ to display the list of available Layer Packages.

Select the required Map Layer Package and click on ‘Load’.

Double-clicking the map layer package itself can often cause it to load duplicate copies of the views in the package – see “Removing a Map Layer” below in this case.
Loading a Map Layer Package will close out any layers that you already had open on the map.
Refreshing the data on the map
Sometimes it can be useful to force the map to refresh the data you have displayed – either because someone has made a change to a record since you opened the map layers, and you wish to see the change, or because the deleted record hasn’t dropped off the map (when deleting to history).
In this case, you can click on the refresh map button in the menu in the top right of the map to refresh the map which will make the record disappear from the map.
Only do this while zoomed in on the map, as it refreshes all visible data on the map which may take some time if you’re zoomed out with a lot of data displayed on the map.

Expanding the Map Layers Window
As per the screenshot below, sometimes the map layers window is not wide enough to read all of the layer names.

To expand the window to be able to read the names:
- Move the mouse over the highlighted blue bar, and the mouse should change to an arrow pointing left and right.
- Hold down the left mouse button and drag the window to expand or shrink as desired.
Layers after expanding them:

Removing a Map Layer
To remove a map layer from the list you need to click on the map layer header on the map and select Remove Layer from Map (clicking the close button on the grid layer on the left-hand side of AWM only closes the grid, not the map layer). In the screenshot below, choosing the x on the grid list to the left-hand side of AWM would only close the DoWH Projects grid while leaving the map layer intact, choosing “Remove Layer from Map” from the drop-down menu will close both:

Finding a road or location on the network
The search bar in the top right corner of the map allows you to quickly jump to specific locations on the map.

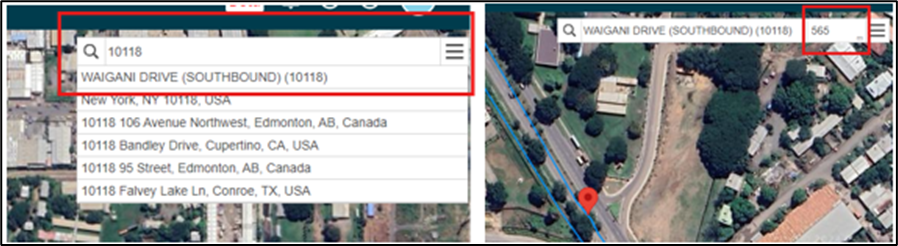
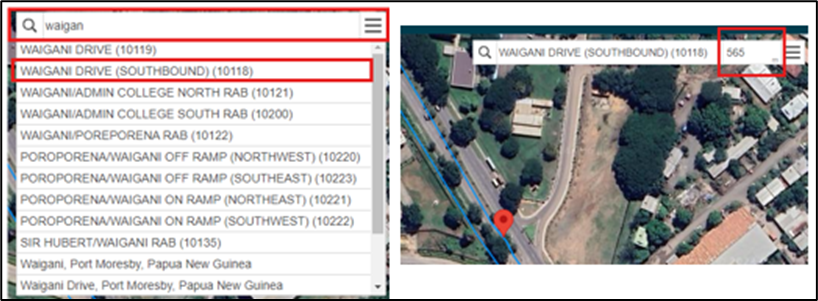
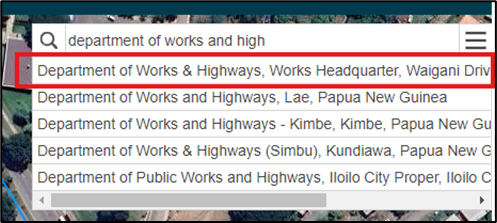
There are four ways to use the bar (all examples are using Waigani Drive at the main entrance to the Department of Works and Highways headquarters):
- Enter the Road ID of the road you are looking for and enter the distance along that road to go to the specific location.
- Enter the Road Name (or enough of a portion of the name to filter the list down only a few options) of the road you are looking for and enter the distance along that road to go to the specific location. Note all the road names in ALL CAPS are part of the road network setup in AWM.
- For a more general location, you can enter the name of the location (such as a village name) and if Google has the location identified in its map data, you can select the location to go to it (be careful to check the full description offered in case you end up in another country instead).
- Latitude and longitude values can be entered in the format Lat, Long as decimal figures to go to a specific location without needing to know the Road ID or distance down the road (see 'The i Tool - Getting the details of a location in AWM' below to see how you can then get the Road ID, Name, and distance down the road to use). Make sure to keep the negative values for southern latitudes.


Other Navigation Tools

 | Information from map |
 | Measure on map |
 | Zoom to Extents |
 | Zoom to Area |
 | Zoom in and out |
The i Tool - Getting the details of a location in AWM
To locate a spot in AWM terms, use the i button located at the bottom right of the map view and click on the point you need to locate.
This will load up the location data, giving you the road name (with ID), location along that road, along with the side and offset from the centreline to your selected point (along with an easting and northing value):
Using this on two points along the road is a quick way of identifying which direction the road is running in when you are unsure of this.
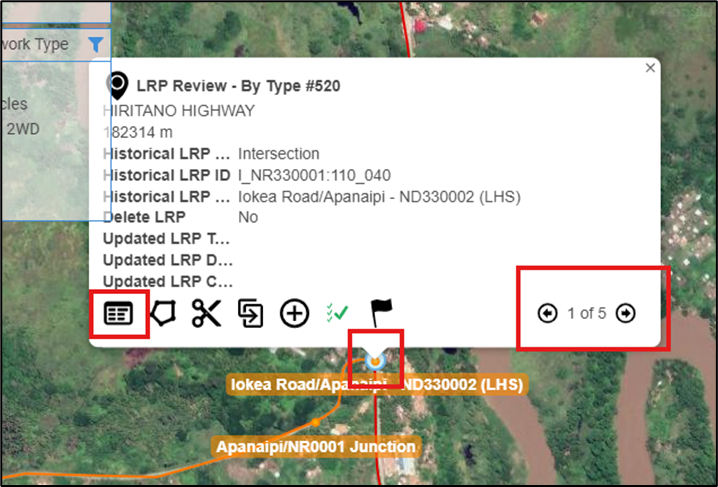
Open a record
- Click on the record on the map.
- If there are multiple records at that location, navigate through to the record you need using the arrow buttons on the bottom right of the pop-up.
- Click on the button on the left side of the pop-up to load the record.

Editing a record
Once the record is open, the data can be filled in as required.
Some things to note while editing:
- Greyed out fields such as those under the Historical LRP section shown in the screenshot cannot be edited.
- Fields with a little blue triangle in the bottom left (Asset ID and Road Name in the screenshot as examples) are required fields and must have data in them to be able to save the record.
- Note that the Asset ID field is a special case – the system will populate this field for you.
- Fields with a drop-down list (Road Name in the screenshot) rely on a list of lookup values – this list may take some time to load depending on your connection and the size of the lookup list. You can either use the drop-down and scroll through the list or type a portion of the value you want, and the system will provide a filtered list for you to select from.
- For example, if you type “Poro” in the road names, you will get a filtered list back that includes among others Poro Moro Road and Poroporena Highway, while typing “Poroporena” will ensure you only get the roads associated with Poroporena – the two main road sections, along with the roundabouts and on/off ramps.
- The main form doesn’t always show all the fields for a given section – if the blue section heading has an arrow “>” at the right, this can be clicked to open the secondary form for that section, as shown in the screenshot.
Generally, this is done where there are fields that aren’t used very often or are of limited importance – just remember if there’s a blue arrow on the main form, there are more fields than you can see on the main form alone.

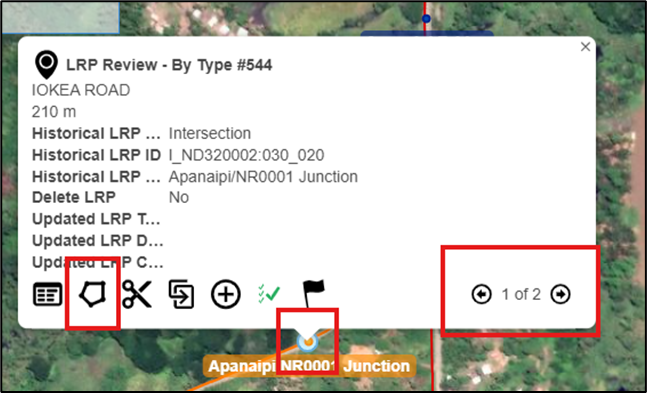
Shift a record on the map
- Click on the record on the map.
- If there are multiple records at that location, navigate through to the record you need using the arrow keys.
- Click on the 2nd button on the left side of the pop-up to edit the location.

This will load up the edit location menu. While this is open, do the following:
- Check that point is selected (for other assets, line or area may be appropriate but for this exercise we are only dealing with a point asset).
- Drag the red dot from its current location to the correct location (in the example below, to the first abutment of the bridge).
- Once it’s in its correct location, click Next to do the next part of the location update.

This brings up the location data for the new position.
- If the location is on the correct road, only the displacement needs to be updated (make sure that the tick box is checked).
- If the location should be on a different road (often occurs with points around an intersection for example), click the Change link by the Road Name – in this case, it will list all the nearby roads it could be associated with, and the displacement value will be automatically updated based on the road chosen.
- Once you’re happy with the new location, click Finish to update the record.

Editing the shape of a record
This is very similar to shifting the record.
- Click on the record on the map.
- If there are multiple records at that location, navigate through to the record you need using the arrow keys.
- Click on the 2nd button on the left side of the pop-up to edit the location.


This will load up the edit shape menu.
Each shape is made up of two types of point (except for point shapes which are literally a single point):
- Bright white dots which are the actual points that define the shape – these can be dragged to change the shape or can be double clicked to delete them.
- Faded dots midway along the lines between these bright white points – these can be dragged to create new points to further modify the shape – once they have been used to create a new point, it will turn bright white with new faded dots at the mid points of the lines either side:
 |  |
If you are only making minor changes compared to the overall shape, it’s probably easier to drag the individual points to modify the shape, otherwise if the changes are major, you can use the clear button at the top of the menu to start completely fresh:

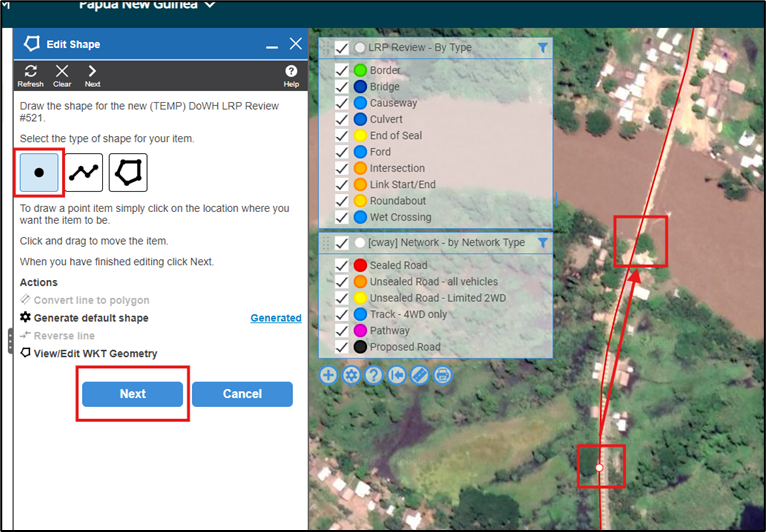
What needs to be done depends on what sort of shape you are trying to modify or draw:
- Point records are very simple – either use clear, then click on the location to add the new point or drag the point from its current location to the new location.
- Line records either drag the individual points to their new locations, using the faded points to add any necessary new points, or double clicking existing white points to delete them, or start completely fresh clicking at each point you want to add to the new line, double clicking the very last one you add to finish the line.
- Polygons can be like lines if you are modifying them using the combination of existing points and the faded dots to add new points, but can be done one of two ways when starting from scratch:
- Select Polygon and click on the map for each point that defines the shape, double clicking on the last point to finish the shape – note that you don’t have to make the last point meet the first point – the system will complete the shape between your first and last points created.
- For assets which are regular in shape (such as bridges) you can use a line (following the process as given in (2) above) to draw the line, and then use the option in the edit shape menu to “Convert Line to Polygon” which will prompt you to enter a width for the shape – (if the record has a width field, it will take a couple of moments but it will populate the prompt with the width):
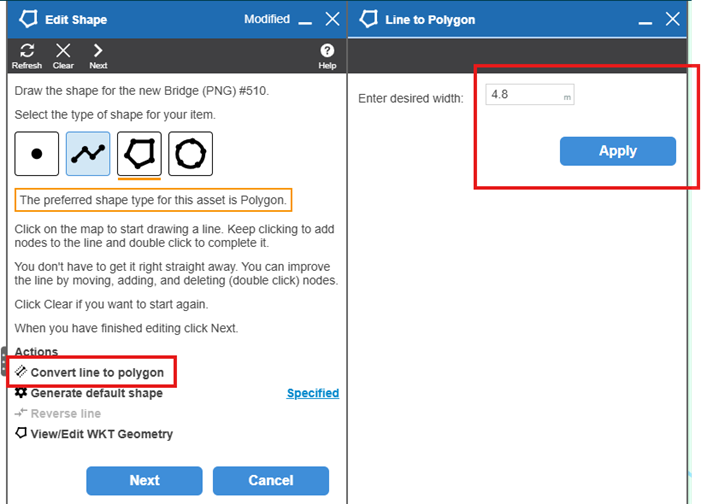 This will draw a polygon centred along the line that you’ve drawn – this is the quickest way to do a regular-shaped polygon.
 This will draw a polygon centred along the line that you’ve drawn – this is the quickest way to do a regular-shaped polygon.
Clicking Next on the Edit Shape menu will apply the shape and calculate any changes that should be made to the record based on the new shape you have applied. Note that if you are confident that the existing dimensions for the record are correct, you can turn off the specific update for the dimensions while updating the co-ordinates and route position of the record:
Adding a record
Click the green plus button in the bottom left of the map screen. This then opens a menu with all the different asset types you have showing as layers on the map, for this example, we will use the (TEMP) DoWH LRP Review asset type – selecting the asset type will automatically take you to the next step.
This then opens the menu to add a shape to the map to locate the new asset.
At this point, you can follow the instructions for editing a shape to draw the shape on the map. Note that as you are creating the record from scratch it will not pop up with a changes tab like editing a shape, but rather will prompt you to select the road to assign the record to – selecting the road you want will take you to the asset record screen so make sure you pick the road you want.
Note that the value in metres behind the road name is the offset from that road’s centreline – this is a good way of double-checking which road you intend to place the asset on. This will then bring up the new record for editing, with the location data populated based on what you selected (if you selected No Road the road and location fields would be blank). See the section on editing a record for what to do but note that as this is a new record all required fields must be populated before you can save the record.
Deleting a record
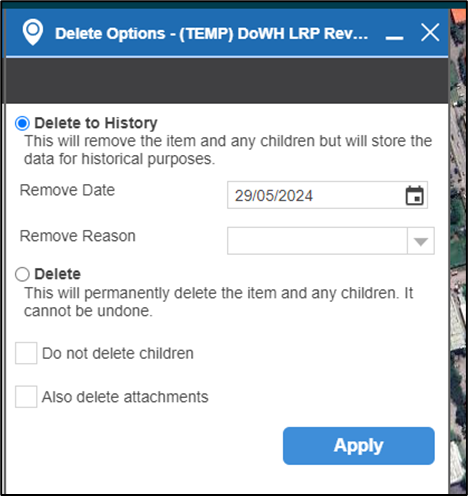
To delete a record, open the record you wish to delete and click on the delete button in the top menu:
This will bring up the delete menu – the option you choose here depends on why the record is being deleted.
Generally, the first option “Delete to History” is the one you should choose (note that sometimes a particular asset will not have this option – most do however). This end dates the record which AWM then filters out for general use on the map, while keeping the historical record in the database – useful for example when a major culvert is replaced with a bridge, having the historical record of the culvert can be useful for understanding the nature of the area at a point in the past.
If the record was created in error (a LRP created for a bridge where there is obviously no such bridge for example), the second option “Delete” can be selected – this will delete the record from the database completely. This option should only be chosen when the record should not exist (it has no historical information/value or should never have been created).
- Note that when picking the “Delete” option, generally you would want to leave the two tick boxes below it unticked – normally you want to delete the child records associated with the one you are deleting (spans for example, are a child record for a bridge – if the bridge is deleted, you’d want to delete the associated spans).
- Attachments on the other hand are records that are linked to the record you are dealing with but not an integral part of the record – for example the guard rail on the approach to the bridge may be linked (attached) to the bridge to indicate that it forms part of the approach to the bridge, but if the bridge is deleted, the guard rail may still exist. These “attached” records should be carefully reviewed to ensure that all of them should be deleted before ticking the delete the attachments option.

As well as working with the map, which is the most common way of working in AWM, you can also work with the individual layers in a grid environment which can be useful for looking at larger sets of data.
Finding the Grid
For each layer you add to the map, a corresponding grid is added to the left-hand side of the application: The grid itself can be accessed by clicking on that name in the left-hand menu.
Closing and Recovering the Grid
When you mouse over the grid on the left-hand side, a “x” will appear at the right-hand side of the grid name – clicking this will close the grid (but not the layer on the map). To recover the grid after you’ve closed it, click on the layer in the map, and choose the “Show Grid” option from the menu that pops up to bring the grid back up on the left-hand side:
The Grid itself
Clicking on the layer name in the left-hand menu brings up the grid:
Individual records can be selected in the grid by clicking in the small tick boxes on the left-hand side of the grid – this can be useful for quickly grabbing some records to export, but generally it’s better to use filters.
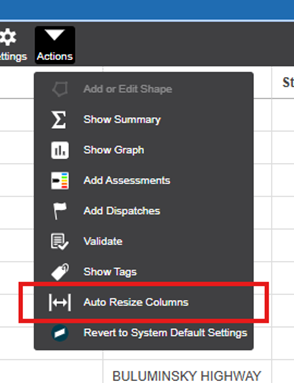
At the top is the action menu:
Key items in here are:
- Refresh – updates the current grid (can be useful to pick up changes colleagues have made while you’ve been in the grid).
- Add – you can create a record from the grid rather than the map – the process here is slightly different as the record’s shape is generated from the location and dimension data that you enter rather than deriving the location/dimension data from the shape.
- Columns – this allows you to specify the fields of the record you wish to see in the grid (generally the grid only shows a subset of the information on a record).
- Filter – you can modify the filter applied to the grid here – note that this filter is ALSO applied to the layer on the map.
- Export – useful for exporting data out of AWM to share with others who may not have access to the system.
- Settings – allows you to choose between the saved views you may have set up as described in “Customising and saving views”.
- Actions – there is one option here that is useful “Auto Resize Columns”, which will size the columns to match the headings and data in the columns, potentially getting more data on screen.

Clicking on a row in the grid will open the record for that row just as if you had clicked the show details button on the map at which point you can work with the record as described earlier in this document.
Modifying the columns visible in the grid
Click on the Columns button in the action menu at the top – this will open up a tab which lists all the columns on the table you are looking at on the grid – those ticked will show up on the grid, while columns which are lookups to other tables have a black triangle that allows you to expand to see the fields on that table and include them in the grid as well.
In the example shown below, the column “Culvert Pipe Shape” is a lookup to another table – clicking on the black triangle then shows all the available fields from that table as well as those directly held in the Major Culverts table – in this case, you could choose to include the Calculate Area From Diameter from the lookup table to the grid:
Adding a record in the grid
To add a record via the grid you will need to gather location data to populate the record with – this information can either be supplied by others with access to the system, or can get captured by using the i Tool as described in the AWM Navigation article.
Depending on the record you are trying to add, this may be simply the road name, and a route position along that road (a point asset) or may require both a start and end location.
When adding the record, the location section of the record should be loaded with this information, otherwise the record will not save, or worse, may not show on the map at all as it has no location data to map to.
Aside from this requirement to populate the location information, the process for adding the record otherwise follows that described in the AWM Working with Records article, at least from the point the record itself opens.
Exporting from the grid
To export information from the database, click on the Export button at the top of the grid – you can either export “selected” or “all items” – choosing selected items only exports those items in the grid that are ticked (see screenshot below) while all items exports all the records in the grid (based on what filters you may have set). You can either export directly to Excel (in which the file can be found in your downloads folder) or copy to the clipboard and paste into a file of your choice – Excel or otherwise. Just be careful when using the copy paste option as some large text fields which allow for line breaks (use of the Enter key in the field to form paragraphs) will cause the record to paste over multiple rows in Excel – in this case you’re better off exporting directly to Excel.
Help Videos
Select the Help icon.

Each area provides a number of videos to help.
‘Contact Us’ to log an issue with Thinkproject (owners of AWM).
To apply a filter to an asset table based on information in the carriageway table (such as province or sealed/unsealed network) the following steps should be followed (note that this article outlines how to apply a filter for province – if you want to filter for network type or other information, change “province” for the appropriate field).
Open the filter for the layer you want to filter.
Use the drop-down arrow beside the “Add” button.
Select the third option “Add condition on a related item”.
On the next tab that opens up once you select the option, make sure that the option “have” is selected, and then click on Select Table.
In the select table tab that pops up, type carr in the search box, and then select “carriageway sections” in the list that shows up.
Once you’ve selected Carriageway Sections, it will automatically return to the linked tab where you want to select displacement overlaps option and click apply:
This is why we choose displacement overlaps – the asset has a start RP that overlaps with one of the carriageway sections – it then uses this carriageway section to filter for the data held on the carriageway section (note that the RPs given here are examples and may not match those in the actual database ) – in this case, the example bridge would be assigned to the Morobe province based on its start position:
The select column tab will pop up as usual – here we want to select province (either start typing province in the search bar at the top or scroll through the list to find it):
This will cause the lookup for province to pop-up – select the province(s) or region(s) you want to filter by – you can tick as many as you want – if you’re only after a single province, only select that single province, and then click apply:
This takes you back to the main filter tab – if the auto apply option at the top is ticked, this will have immediately applied your filter, and you can close the tab – otherwise you’ll need to click Apply and then close the tab:
The filter is now applied, and this can be repeated for any table that holds both a road name, and either a location or start and end location recorded against the asset.
A map layer package has been set up to ensure that the key data held in the carriageway table (basis of the network) is exported without requiring you to modify the layers to do so. The map layer package is [carrway] Network Export to file.
This has two separate layers:
- [cway] Network Export – Existing: the current network including any provincial or district roads loaded into the database (these can be filtered out in the external system by using asset_owner).
- [cway] Network Export – Proposed: only those unconstructed sections of the missing links (those sections which are currently provincial roads will be included in the Existing layer) and proposed roads.
If the export only needs the existing network or the missing links, you can export from that layer alone to complete the task, however if the export needs both the existing network and the missing links, then the export must be done on each layer separately (this will create two separate export files).
To do so, select the layer you want to use and make sure that it’s active: Left-click on the layer bar on the map (making sure to not click on the tick box or filter button), this brings up the layer menu, from which you want to select the option to Export:
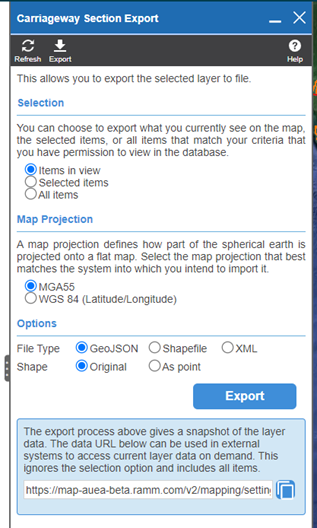
As we’re exporting the full network, the selection should be set to All Items:
The other two options can be used when only a particular section of the network is needed to be exported:
- Items in View exports only those items you can see on screen, so if you zoom into the Milne Bay Province, for example, you will only export those roads which are visible on the screen based on what you can see.
- Selected items uses the Select by Rectangle or Select by Lasso options to allow you to draw a shape on the map which in this case will select all the carriageway sections which are at least partially within the shape you draw (note that it selects the individual carriageway sections, not the full road – if you draw a shape that includes all of Morobe province, you will only get the carriageway sections on the Highlands Highway, as an example, where the carriageway sections are at least partially within the Morobe province).
The next set of options determines if the exported file is exported in northing/easting co-ordinates (MGA55) or latitude/longitude (WGS84) – unless the person you’re providing the exported data to specifically requests latitude/longitude, leave the selection at the default MGA55.
The final set of options determines the file type that is exported and whether the network is exported as lines (Original) or points (this option defaults to Original – make sure that As Point is not selected, otherwise you’ll end up exporting a bunch of random dots around the map rather than a network!).
Unless the person you’re exporting the file for requests otherwise, select the Shapefile option:
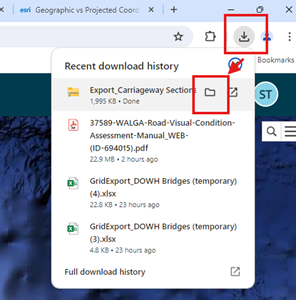
Clicking the Export button will then download the file into the default download directory for the browser you are using.
The file will be named something like “Export_Carriageway_Sections” and may have a number (5) (example) behind it depending on how many times this has been exported previously (it adds the number behind the file to make the file name unique).
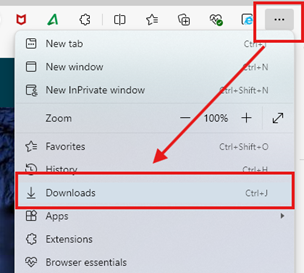
This can be accessed using the downloads button in the browser as follows (note that clicking on the folder beside the filename opens the folder with that specific file highlighted).
- Chrome – once the download starts the download icon will appear in the top right of the browser – once the download is completed, click on this, and then click on the folder icon that appears when you mouse over the file in the list.
- Edge – once the download is complete the download window will pop up and then disappear. To access the file after the download window disappears, click on the three dots icon in the top left and select downloads from the menu:
 Then when the download window opens, click on the folder that appears as you mouse over the file you want:
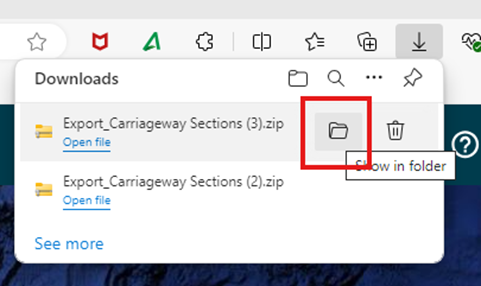

 Then when the download window opens, click on the folder that appears as you mouse over the file you want:
Note: AWM used to be called RAMM.
When you first open RAMM (AWM) mobile you will see this log-in screen. Use the same log-in details as you would use for go.ramm.com. Next, you’ll be asked to select the database. Select Papua New Guinea.
 |  |
Next, you will see the screen below. There are no layers currently active on the map. Click on settings in the top right corner.

In the settings menu there are two key areas - Enabled Groups and App Settings. Enabled Groups is where you turn on different asset layers so that they are visible on the main map. App Settings is where you can change settings such as the base map layer, switch the test environment from alpha to beta or production mode (when production becomes available), change the theme colours to dark mode, turn on the secondary column for assets, update the map touch sensitivity and so forth. There will be more settings that become available as the beta environment gets updated and refined. Click on Enabled Groups.

To turn things off and on in RAMM (AWM) mobile - you use the sliders shown on the far right next to assets. These sliders turn blue when a specific setting is activated and are greyed out when the setting is inactive. Click on the slider to activate the list of assets.

Once the asset list is activated, you can search as you normally would in AWM. Search for "Bridge" and select DoWH bridges (temporary). Remember the slider colour on the right will change to blue once activated.

Once you have DoWH Bridges (temporary) loaded, search for linear reference point and then select Linear Reference Point.

The next asset layer to load is Carriageway Section. Search for "Carriageway" and select Carriageway Section. Once carriageway section is loaded, click on Show Enabled Table Groups on the left. 
When you select Show Enabled Table Groups the list view will change to only show asset types you have selected. Click on the back arrow on the top left to go back to the main settings menu.

Now that we have the correct asset layers showing on the map, next we want to change the base map. Select App Settings.

We want to change the map source from mobile default, so select Map source under maps.

Select Open Streetmap and then select Load Open Streetmap on the left. A pop up should appear saying settings loaded. Once Open Streetmap is loaded, click on the back arrow to go back to the settings menu.

Select the back arrow on the top left to go back to the main settings menu.

Select the back arrow on the top left to go back to the map view.

Purpose of the Data Fix Table
The data fix table is used to record updates or fixes to asset or network data where the person identifying the issue does not have access, the experience or the training to make the change(s) to the data themselves.
A user with the appropriate permissions, training and experience can then review the data fix request, make the necessary changes to the database, and then close out the data fix request.
Examples of what can be recorded in this table include (not a complete list):
- The network centreline not following the real alignment
- The network centreline starts/stops in the wrong location
- Changes in the network definition not recorded in the right location (e.g. the change from sealed to unsealed network)
- An asset is missing from the database (standing onsite looking at a bridge for example where the database doesn’t have an asset recorded)
- The asset recorded at the location no longer exists (a bridge may have been washed out in a storm event for example)
- Some part of the data for the asset is incorrect (a bridge may be recorded as a single lane beam and slab bridge, for example, but is in fact two lanes wide)
This How To covers adding and completing/removing a data fix record.
Adding a Data Fix record
Make sure that the Data Fix Request layer is on map – it’s been included in the map layer packages that have been shared for the various reviews.


Select the Data Fix Request table to add the new item to.
Select point or line depending on which is appropriate (for example, a data fix request to split a carriageway at an intersection is fine as a point, while identifying a new road to add to the database needs to be loaded as a line).
Use LINE for the network for anything that requires an extension to an existing road, addition of a completely new road, or change in alignment of an existing road.
For anything else, use POINT, and record the changes in the brief description of the issue field.
For line records, the accuracy of the line needs to be enough to understand what needs to be done – if there are other roads that may confuse matters, the line should be done with enough attention to detail to make sure that it’s clear which road we need to map the fix to.
On the other hand, where it is clear what needs to be done (such as a missing road where the aerials are clear for example), the centreline can be loaded as a rough guide.
Example of “rough” capture for a linear data fix:
The screenshot shows a road for “rough” capture – for clarity’s sake I’m using open street maps rather than aerial imagery but the idea remains the same – 12km long, it’s too long to want to have to carefully map out the centreline for the full distance:
Instead, we speed it up a bit by only mapping out a few points (in this case the full 12km road with only 10 points in total) to give a rough guide as to where the road runs from and to:

Assigning the data fix to a road and entering the necessary data:
Once the data fix point or line has been created (double click the last point when drawing a line to finish it), click Next to move to the road select screen.
Select the road it should be attached to – the metre value behind the road name is the offset from the centreline of the road in question and is an indication of how close your starting point is to the road. Generally, the road to attach the record to should have the lowest offset (with one exception at intersections where you may actually be closer to the centreline of the other road – in this case you’d pick the road it should be on rather than the closest road).
Clicking on the road to use will automatically take you to the record, with the location data filled out based on your choice. Once the form loads, you only need to update the “Issue” section of the form:
Field | Option | What’s required |
Network or Asset | Lookup | Whether the issue is network or asset-based |
| Network | Use this for centreline or carriageway issues (such as a change from sealed to unsealed network in the wrong location) |
| Asset | Use this for a specific type of asset such as a bridge or river crossing |
Type of Issue | Lookup | The first three options should be used if Asset is chosen, the last 3 for network issues only |
| New Asset | [Asset] There should be an asset at this point, but it currently does not exist in the database. |
| Remove Asset | [Asset] There is an asset in the database that no longer exists – either the data was wrong to start with or the asset no longer exists. |
| Data Incorrect or Missing | [Asset] Some piece of data on the asset record is incorrect (type of bridge for example or diameter of the culvert) or is missing completely. |
| Missing Network | [Network] A road is missing from the database completely and should be added. |
| Modify Centreline | [Network] The centreline should be extended (a road runs further than the current centreline shows) or modified (aerials show the road running straight while the centreline has it curving between the two points). |
| Network Data Incorrect | [Network] Some piece of data on the road or carriageway is incorrect (a road is incorrectly labelled as a National District when it should be a National Main for example). |
Asset Type | Lookup | If you select Asset above, this field becomes available to record the specific asset type the issue relates to – some key asset types: |
| Bridge (PNG) | All types of bridges including bailey, concrete, timber, etc. as well as log bridges. |
| Causeway (PNG) | All low-flow structures built to allow crossing of a waterway, whether they include pipes as part of the structure or not. |
| Major Culvert (PNG) | All culverts of 2m2 area or 1.8m in width/diameter or greater. |
| River Crossing (PNG) | Sites where the road exists on both sides of the river where the river can be forded by vehicles to continue along the road (and there is no structure there to support this). |
| Tunnel (PNG) | All bored or cut-and-cover tunnels, along with structures where major culverts have been utilised to allow traffic under another road (an example being the Waigani roundabout using Armco culverts under Poroporena Highway). |
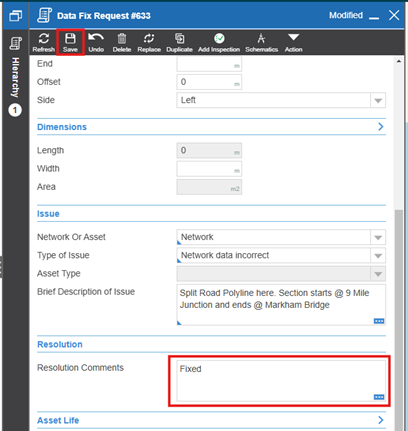
Brief Description | Free text | Required, enter enough information that someone else could make the fix, e.g. for incorrect data “Culvert diameter – should be 600 dia”, or “Update centrelines to match aerial imagery” |
Completing or removing a data fix record
Data fix records are intended to only be temporary, existing in the database until the fix is made, or the request is determined to not be necessary.
Removing the data fix may be done by both the original user who added it as well as the reviewer, while completing the data fix should only be done by the reviewer once they’ve made the necessary fixes requested.
The process to complete or remove a record is very similar with only two steps being different, so the following covers both as a single process.

In the record itself, select the Delete option from the menu.
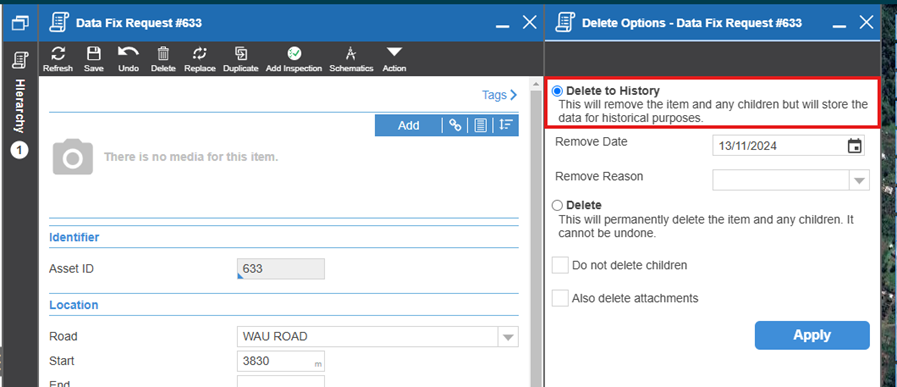
To complete this process, you will need to select a “Remove Reason” – this is the one place that the process differs between completing and removing – if you are completing the data fix request as the issue has been resolved, select “Data Fixed”, otherwise if you are removing the request as it’s either not valid or no longer necessary, select “Removed”, and then click Apply.
The system will then end date the record with the remove date, and once finished, the record will be greyed out with no fields being editable – close the record and return to the map.
If the record doesn’t disappear from the map you can click on the refresh map button in the menu in the top right of the map to refresh the map which will make the record disappear from the map – note only do this while zoomed in on the map, as it refreshes all visible data on the map which may take some time if you’re zoomed out with a lot of data displayed on the map:
Notifications for removed or completed data fixes
As part of the process of resolving these data fix requests, an email is automatically generated and sent out overnight for those records that have been end-dated that day.
The email is sent through to the email associated with the login of the user that raised the original data fix request(s) along with any other users assigned to the same province (as the AWM Mobile tablets are using a fixed user for each province, which may or may not be the same as the actual user making use of the tablet).
The email includes the status of the data fix (removed or data fixed) and the resolution comments for the fix(es).
This article demonstrates how to adjust the dimensions for a record. This may be needed when the actual length drawn is different from the calculated length (end location - start location) for the record. This is expected for records that either are only loosely associated with a road or not associated with any road.
When Actual length is not equal to calculated length then a Length Adjustment and Adjustment Reason need to be populated.
If you don't populate the Adjustment Reason then you will get an error message “Adjustment reason is required”. The Reason field has to be populated before you can save the record.
The following provides a guide on how you can find and populate the Adjustment fields.
These Adjustment fields can be found under Dimensions. This can be located by clicking on the blue arrow (>) to the right of the Dimensions heading to access the secondary tab where the Length, Adjustment, and Reason can be found.

Once the Adjustment field is no longer blank or 0, the Reason field becomes required.

The error message you’re seeing “Adjustment reason is required”, means that the highlighted Reason field hasn’t been populated and needs to be populated to allow you to save the record.
| Adjustment Reason | Generally Adds or Subtracts | Use? | When to use |
|---|---|---|---|
Additional to give Total | Adds to | Yes | Where the line starts on the centreline (or at a given offset to the C/L) and then moves away from the C/L/given offset (such as a footpath that may form an arc away from the road kerb before returning back to the kerb 100m down the road) before returning back to the C/L/given offset (+/- minor variations in the offset). Also use this one if you have no road (and therefore no start RP or end RP). |
Ends away from the road | Adds to | Yes | Line starts at some point on the road but diverges from the centreline at some point along its length to start/end away from the road (while the road centreline continues) |
Ends beyond Road End | Adds to | Yes | Line starts at some point on the road and follows the centreline either to the end of the road or back to the start of the road, and then continues for some distance past this point |
Common Section | Subtracts from | Yes | When two separate lines merge for a distance but where there shouldn’t be a duplication such as at a 4-way offset intersection where the second road centreline might effectively travel along the main road centreline for a short distance – while the start/end RPs on the secondary road absolutely need to account for the overlap to get the appropriate location, the overall network length shouldn’t double count that section. |
Cul de sac | Adds to | No | Unlikely to be used, used to add distance where a cul-de-sac head has a small island that increases the effective driven length for the road. Fairly minor adjustment and generally better to update the actual centreline to match the reality on the ground. |
Dummy of No Length | Subtracts from | No | Most common use for this one is to remove road lengths from the system so that, for example, provincial road lengths aren’t reported when summarising the network data – better to use ownership to remove so generally this one isn’t likely to be used. |
Starts or Ends at an Intersection | Subtracts from | Yes | Similar to “Common Section”, this one is used to remove the overlap in length for the section of the centreline where it falls within the width of the major road – generally only used with the network rather than assets. |
No adjustments made | Neither | Yes* | Only use if setting adjustment to 0 or deleting adjustment still requires you to enter a reason – this one indicates that there should not be any value other than 0 in the adjustment field. |
Roundabout | Adds to | Yes* | Where minor roundabouts have not be set up as their own centreline/carriageway you may need to use length adjustment to add a few metres to the carriageway length or asset length where it tracks around the roundabout rather than following the straight centreline. Should be fairly rare as most roundabouts on the national network are large enough to be separated out into their own distinct centreline. |
Unknown | Both | Yes* | Only use where it is unclear as to which option you should be using – wherever possible use one of the other options. |
Widening | Adds to | No | Unlikely to be used – very minor adjustment to the overall length where the line crosses two carriageway sections with significantly different width where it’s enough to mean the lateral shift is enough to add to the distance. |
Note: The * in the 'Use?' column indicates that it is rare.
Generally, “Additional to give total”, “Ends away from road” and “Ends beyond road end” should cover most of your needs.
