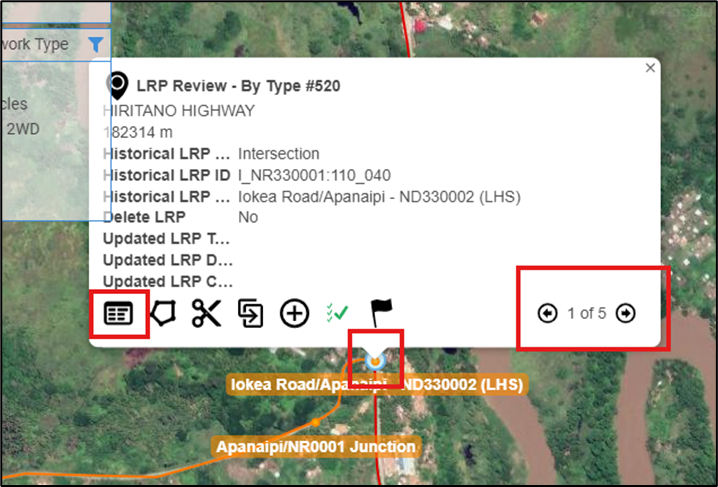
Open a record
- Click on the record on the map.
- If there are multiple records at that location, navigate through to the record you need using the arrow buttons on the bottom right of the pop-up.
- Click on the button on the left side of the pop-up to load the record.

Editing a record
Once the record is open, the data can be filled in as required.
Some things to note while editing:
- Greyed out fields such as those under the Historical LRP section shown in the screenshot cannot be edited.
- Fields with a little blue triangle in the bottom left (Asset ID and Road Name in the screenshot as examples) are required fields and must have data in them to be able to save the record.
- Note that the Asset ID field is a special case – the system will populate this field for you.
- Fields with a drop-down list (Road Name in the screenshot) rely on a list of lookup values – this list may take some time to load depending on your connection and the size of the lookup list. You can either use the drop-down and scroll through the list or type a portion of the value you want, and the system will provide a filtered list for you to select from.
- For example, if you type “Poro” in the road names, you will get a filtered list back that includes among others Poro Moro Road and Poroporena Highway, while typing “Poroporena” will ensure you only get the roads associated with Poroporena – the two main road sections, along with the roundabouts and on/off ramps.
- The main form doesn’t always show all the fields for a given section – if the blue section heading has an arrow “>” at the right, this can be clicked to open the secondary form for that section, as shown in the screenshot.
Generally, this is done where there are fields that aren’t used very often or are of limited importance – just remember if there’s a blue arrow on the main form, there are more fields than you can see on the main form alone.

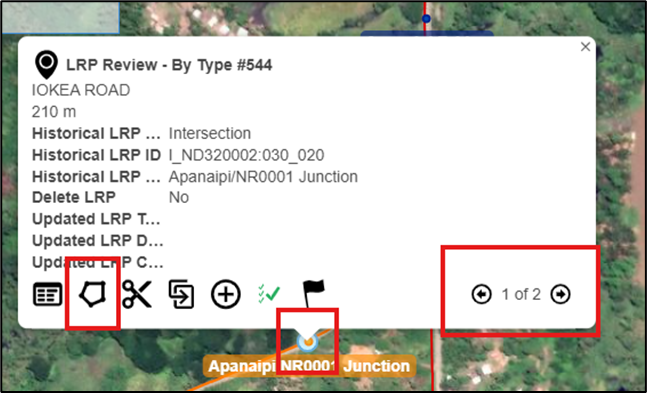
Shift a record on the map
- Click on the record on the map.
- If there are multiple records at that location, navigate through to the record you need using the arrow keys.
- Click on the 2nd button on the left side of the pop-up to edit the location.

This will load up the edit location menu. While this is open, do the following:
- Check that point is selected (for other assets, line or area may be appropriate but for this exercise we are only dealing with a point asset).
- Drag the red dot from its current location to the correct location (in the example below, to the first abutment of the bridge).
- Once it’s in its correct location, click Next to do the next part of the location update.

This brings up the location data for the new position.
- If the location is on the correct road, only the displacement needs to be updated (make sure that the tick box is checked).
- If the location should be on a different road (often occurs with points around an intersection for example), click the Change link by the Road Name – in this case, it will list all the nearby roads it could be associated with, and the displacement value will be automatically updated based on the road chosen.
- Once you’re happy with the new location, click Finish to update the record.

Editing the shape of a record
This is very similar to shifting the record.
- Click on the record on the map.
- If there are multiple records at that location, navigate through to the record you need using the arrow keys.
- Click on the 2nd button on the left side of the pop-up to edit the location.


This will load up the edit shape menu.
Each shape is made up of two types of point (except for point shapes which are literally a single point):
- Bright white dots which are the actual points that define the shape – these can be dragged to change the shape or can be double clicked to delete them.
- Faded dots midway along the lines between these bright white points – these can be dragged to create new points to further modify the shape – once they have been used to create a new point, it will turn bright white with new faded dots at the mid points of the lines either side:
 |  |
If you are only making minor changes compared to the overall shape, it’s probably easier to drag the individual points to modify the shape, otherwise if the changes are major, you can use the clear button at the top of the menu to start completely fresh:

What needs to be done depends on what sort of shape you are trying to modify or draw:
- Point records are very simple – either use clear, then click on the location to add the new point or drag the point from its current location to the new location.
- Line records either drag the individual points to their new locations, using the faded points to add any necessary new points, or double clicking existing white points to delete them, or start completely fresh clicking at each point you want to add to the new line, double clicking the very last one you add to finish the line.
- Polygons can be like lines if you are modifying them using the combination of existing points and the faded dots to add new points, but can be done one of two ways when starting from scratch:
- Select Polygon and click on the map for each point that defines the shape, double clicking on the last point to finish the shape – note that you don’t have to make the last point meet the first point – the system will complete the shape between your first and last points created.
- For assets which are regular in shape (such as bridges) you can use a line (following the process as given in (2) above) to draw the line, and then use the option in the edit shape menu to “Convert Line to Polygon” which will prompt you to enter a width for the shape – (if the record has a width field, it will take a couple of moments but it will populate the prompt with the width):
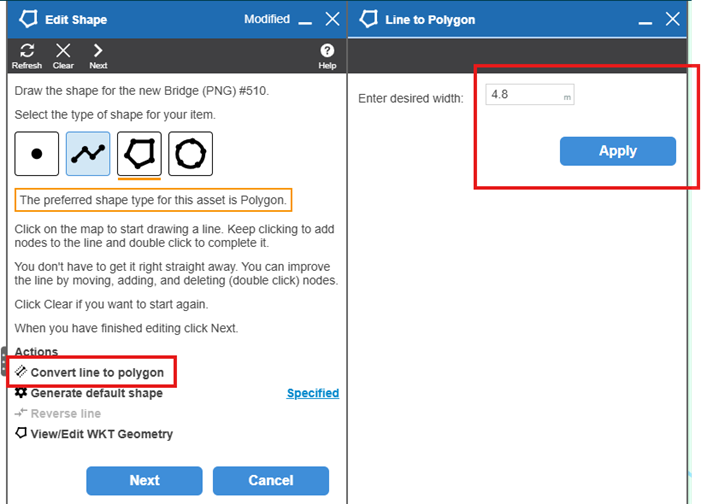 This will draw a polygon centred along the line that you’ve drawn – this is the quickest way to do a regular-shaped polygon.
 This will draw a polygon centred along the line that you’ve drawn – this is the quickest way to do a regular-shaped polygon.
Clicking Next on the Edit Shape menu will apply the shape and calculate any changes that should be made to the record based on the new shape you have applied. Note that if you are confident that the existing dimensions for the record are correct, you can turn off the specific update for the dimensions while updating the co-ordinates and route position of the record:
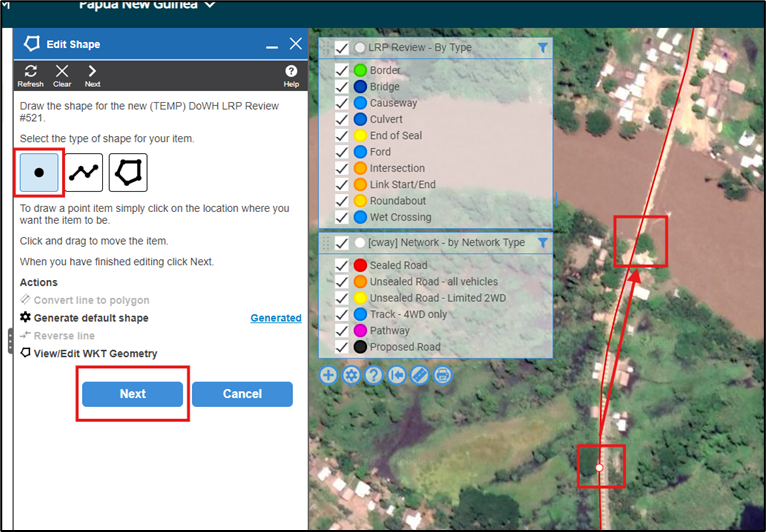
Adding a record
Click the green plus button in the bottom left of the map screen. This then opens a menu with all the different asset types you have showing as layers on the map, for this example, we will use the (TEMP) DoWH LRP Review asset type – selecting the asset type will automatically take you to the next step.
This then opens the menu to add a shape to the map to locate the new asset.
At this point, you can follow the instructions for editing a shape to draw the shape on the map. Note that as you are creating the record from scratch it will not pop up with a changes tab like editing a shape, but rather will prompt you to select the road to assign the record to – selecting the road you want will take you to the asset record screen so make sure you pick the road you want.
Note that the value in metres behind the road name is the offset from that road’s centreline – this is a good way of double-checking which road you intend to place the asset on. This will then bring up the new record for editing, with the location data populated based on what you selected (if you selected No Road the road and location fields would be blank). See the section on editing a record for what to do but note that as this is a new record all required fields must be populated before you can save the record.
Deleting a record
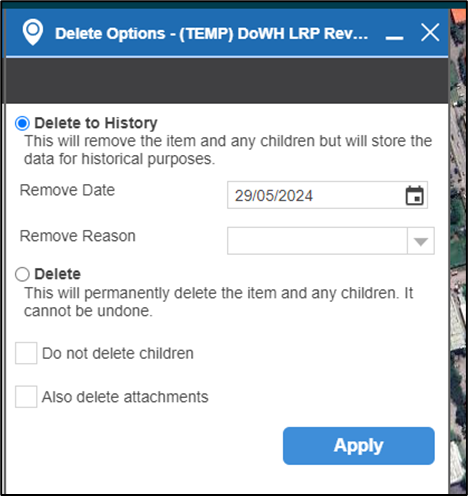
To delete a record, open the record you wish to delete and click on the delete button in the top menu:
This will bring up the delete menu – the option you choose here depends on why the record is being deleted.
Generally, the first option “Delete to History” is the one you should choose (note that sometimes a particular asset will not have this option – most do however). This end dates the record which AWM then filters out for general use on the map, while keeping the historical record in the database – useful for example when a major culvert is replaced with a bridge, having the historical record of the culvert can be useful for understanding the nature of the area at a point in the past.
If the record was created in error (a LRP created for a bridge where there is obviously no such bridge for example), the second option “Delete” can be selected – this will delete the record from the database completely. This option should only be chosen when the record should not exist (it has no historical information/value or should never have been created).
- Note that when picking the “Delete” option, generally you would want to leave the two tick boxes below it unticked – normally you want to delete the child records associated with the one you are deleting (spans for example, are a child record for a bridge – if the bridge is deleted, you’d want to delete the associated spans).
- Attachments on the other hand are records that are linked to the record you are dealing with but not an integral part of the record – for example the guard rail on the approach to the bridge may be linked (attached) to the bridge to indicate that it forms part of the approach to the bridge, but if the bridge is deleted, the guard rail may still exist. These “attached” records should be carefully reviewed to ensure that all of them should be deleted before ticking the delete the attachments option.